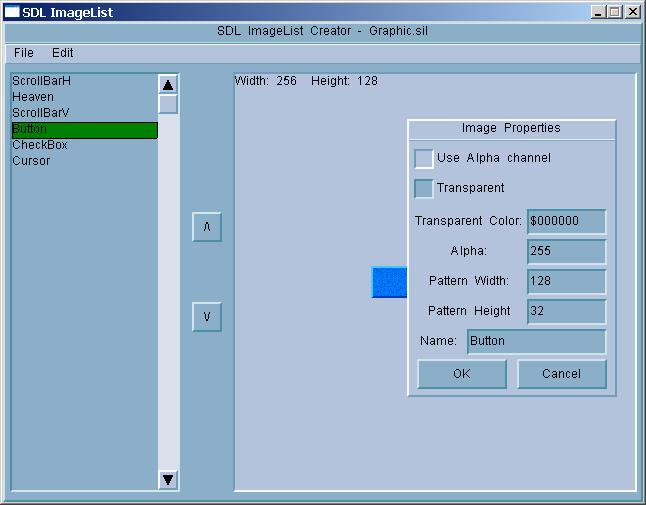
This tool enables you to build sil files. This file contains images in they original format, plus additional data like PatternWidth, Alpha, TransparentColor and other. When you want to edit image's properties you can doble-click image itself, double-click its name in the list or select "Edit-Image Properties..." in the menu. You can add new images by selecting "Edit-Add Images..." when you will get an open dialog where you can select more then one file. You can remove the image by selecting it in the list and then pressing Delete button or selecting "Edit-Remove Image" in the menu. Under Edit menu you can also set the list to be sorted and set if your image list will be compressed. If it contains mainly bmp images, size of file will be much smaller with this option. Compression works under Linux too. Under File menu you can create new list, open the old one or save the current image list.All changes to image properties will have effect when you confirm them, except Use Alpha Channel because that property must be assigned before you load an image. It will have effect when you save an ImageList.
This is the simpliest tool. It has only three button: "Choose file..." which will open save dialog and let you choose font image file name. When you do that it will also generate one more file name which will be the same as image's except it will have "dat" extension. So if you select "Arial.jpg" program will write two file names "Arial.jpg" and "Arial.dat". Now you have two more buttons: "Add data file to an end of image file" and "Extract data from an image file to data file". When you press the Add button it will try to copy data file to an end of image file. It won't copy that data if it already exists in image file. If data file doesn't exist it will give you a message about it. When you press Extract button it will create new data file and copy data from an end of image file to it. Image file will not be changed so data will remain there until you open and save that image in some editing tool. BE CAREFUL, if additional data is already removed program can not know so it will try to extract some data and it may crash.
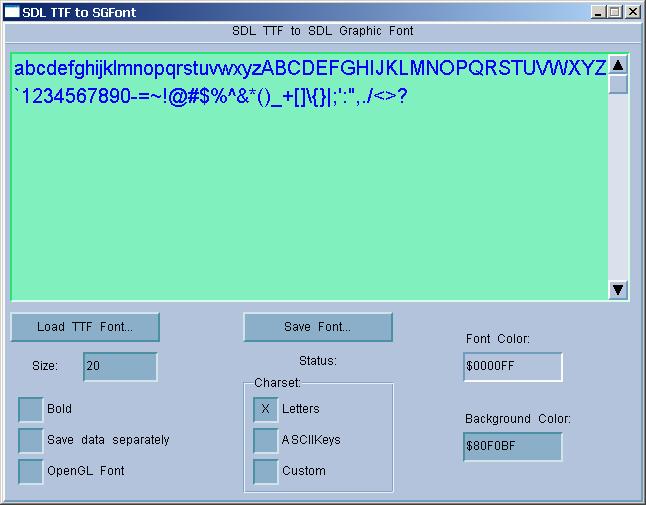
This tool will help you convert TTF fonts to bitmap SGFont. First you would click "Load TTF Font..." to open ttf font you want to convert. Current character set will be written in memo control using selected font. Now you can set size of letters, make them bold, change their color and color of their background. You can also select what characters are going to be drawn. Letters will first list all the letters and then special characters as they appear on the keyboard. ASCII Keys will list al characters as they appear in ASCII table. Custom option will allow you to enter characters as you wish them to appear on the image. Now if you will use this font with OpenGL you should check OpenGL Font checkbox. Image dimensions will be bigger then needed like this but they will be powers of two so OpenGL wont distort the image. Image is always saved in bmp format. If you know you will open that image in some editing tool to change it a little bit or simply change its format to png, tif or anything else you can check Save data separatly checkbox so you will get data file and image file. This way you can edit the image immediately and then add data to it using SGFileOp tool. When you set all that all you have to do is save the font with Save Font... button.
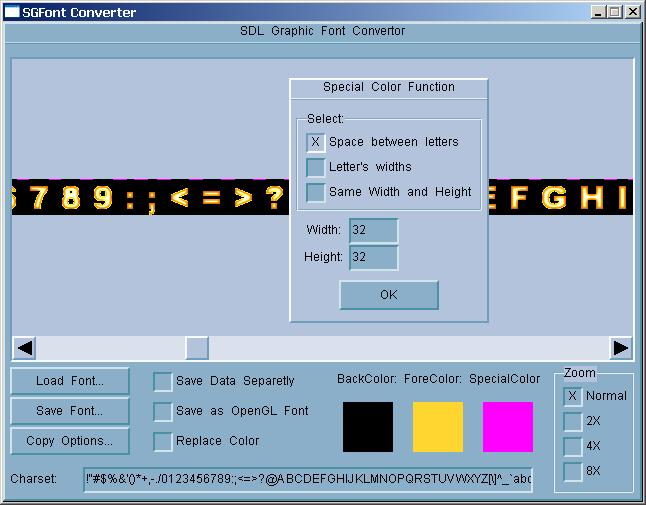
This tool will help you convert other bitmap font formats to SGFont. First you would open an image of font using Load Font... button. Opened image will appear in upper scrolling area. Background color will automaticly be set to color of upper left pixel of the image and can not be changed. To the right you can select how much do you want to zoom the image. This will allow you to select foreground and special color more easily. First you click on the colored square under "Fore Color:" label and then select the pixel on the image that has the color ofthe letters. In case of letters that are not evenly colored like the ones you can see on the screen shot you should set the color to some pixel that represents some average of colors that maybe you would like to change in your program later. You can see what is selected in this case on the screen shot. Now you should select the special color. In many formats special lines or dots on top of the image represents start and end of every letter in the image. In most cases this is pink so you wont have to change special color since this is its default value. In other case you should first click on the colored square under "Special Color:" label and then click on the pixel on the image that has that color. Again you have options to save data separatly and to save the font as OpenGL Font - for description see above tool. You also have the option "Replace Color". This determines how the color of letters will be changed by TSDLRasterFont.Color property. This should be True if letters are evenly colored but if they are not it should be false or changing Color property wont have the right effect. It can be True in first case, too but changing color of the font is much, much faster when ReplaceColor is True. On the bottom of the window you have Charset field where you should enter characters as they appear on the image. You can get standard charsets - Letters and ASCII Keys if you press Return - Enter in that field. At the end you should make sure copy options are right. Click on "Copy Options..." button and then check "Space between letters" if you see that special color lines (or dots) are between letters, check "Letter's widths" if you see that special color lines are above every letter. If you are converting font image where there is no special color but every letter occupies the same space - image can be divided into patters so that every pattern contains one letter you should check third option "Same Width and Height" and write width and height of every pattern in lower fields. After that you can save the font using "Save Font..." button.
You can find the screen shots here.
Now comes the biggest tool. It is form designer for my controls. I've tried to make it look as delphi's form designer as much as possible so you should be able to find you way through it. Left you see an Object Inspector, editing form is in the center and behind it is Code Viewer. I disabled code editing inside this program since it isn't practical and might disturb the program's functionality. You can see buttons for adding new controls to the form and first button which is used for selecting controls. Under File menu you will find recognizable options. Under Edit Menu you have three options: Lock Controls - Default is on and when it is you can not move the controls with the mouse but only by changing their X, and Y properties using ObjectInspector; Show Hints - default is on but when it is off no hints are shown in the program since it might bother experienced users; Proc Implementation - Default is off and in this case program only adds procedure declarations in Code Viewer. This way you can open that file in Delphi/Kylix latter and use Right-Click and "Complete class under cursor" option to add implementations which will be added and sorted. If this option is on it will add procedure implementations but they wont be sorted.
Under View menu you can bring to focus any of above forms but also show some new ones. Images List is a little form that will simply show index and name of every image in the image list you assigned to the form using ImagesFileName property. Here you can easily see what image to assign to what control using its ImageIndex property. Menu Designer you will use to design popup menus and main menu for the form. With button Add Main Menu you will add one menu to the form. Add Popup Menu button will add popup menu to the last selected control. Name and type of that control will be written here so you can't make a mistake. Close button closes this form. Upper combo box will list all menus you have created and when you want to select one so you can modify its properties you will do it using this combo. If menu you want is already selected in this combo but not in object inspector simply open the drop list and select it again. Bellow is a list of items selected menu contains. You can open a popup menu of every item by double clicking on it. If one doesn't still exists it will be created. This is the only way to add subitems to any item. When you select an item in this list it will show in object inspector. When you select an item and press Delete that item and all of its subitems will be deleted. You add new items using Edit on the botton of the form and AddItem button. First you write a caption of new item and then you press Return - Enter or click Add Item button. If this form has no focus its contents will not be refreshed untill it gets the focus.